A.D. Drumm Images, LLC – Landscape, Portrait, and Fine Art Photography in Rochester MN Photography

August 28, 2012

Car show shooting – Tutorial Tuesday

Filed under: General photography,Tutorials — Tony Drumm @ 7:39 pm

My friend, Lance, drove me up to the Twin Cities on Sunday to attend a car show put on by the Wheels of Italy group. In his Ferrari, of course. Wheels means basically anything with wheels that originates in the great country of Italy – cars, bikes, motorcycles, scooters. There are a few other interesting non-Italian vehicles that show up, but they are relegated to the back lot, near the porta-potties!

Shooting at car shows is challenging, so I thought I’d frame this post as a Tutorial Tuesday entry.

The biggest challenge is the lighting. Car shows invariably are parked around noon. You are dealing with mid-day sun – bright, harsh, overhead. All the things you try to avoid if possible. Take that harsh light and blast it all over some of the shiniest objects you’ll every want to photograph. So, what do you do?

I tend to go in tight. I like to shoot details. Shooting a vertical object with overhead lighting is not necessarily bad as you’ll get some decent shadows if you’re lucky. Shadows define the subject. They give it depth and interest. Joe McNally says someone (and editor?) once told him, if you want something to look good, don’t light all of it. Shadows.

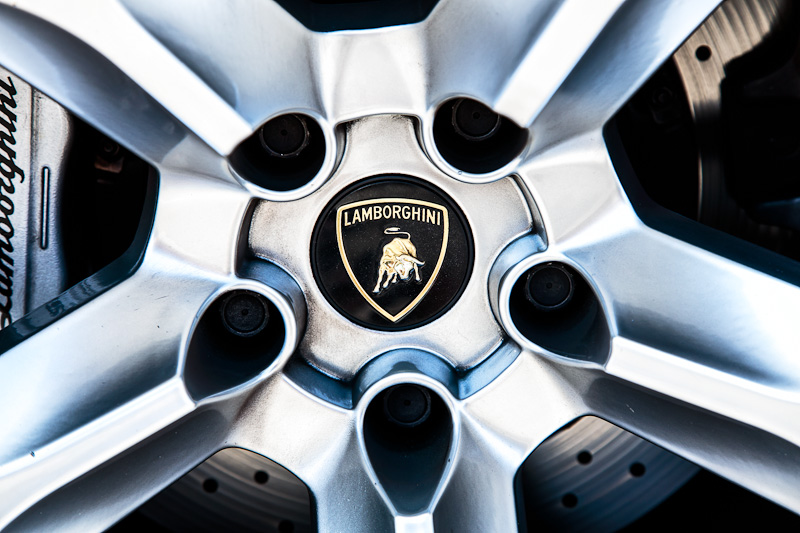
The wheel is a good example, and I think there are some nice shadows around it. This is also a good time to stretch your post-processing software. The Lightroom clarity slider is your friend. Cars just love crisp contrast.

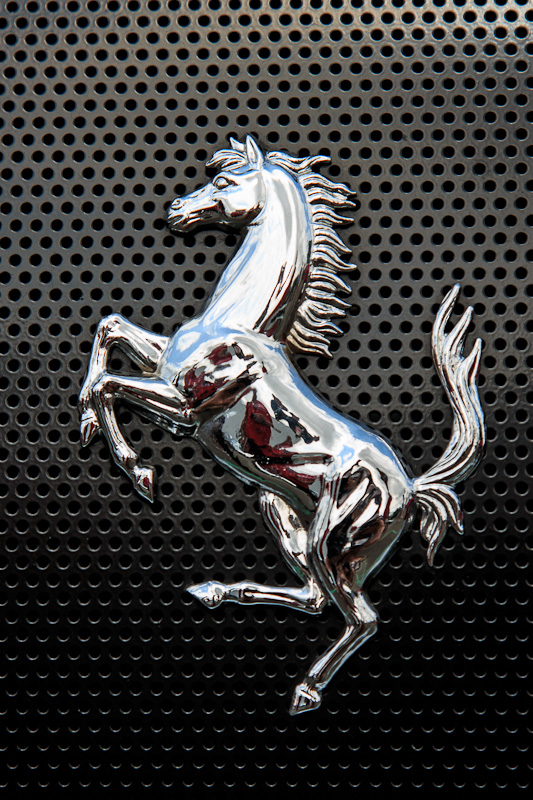
I also like to purposely shoot reflections. The Ferrari prancing horse shows some interesting reflections that make you want to look in closer and see what’s hidden in there. I shot a silver symbol that turned red from the car parked next to it and set it off, made it more interesting.

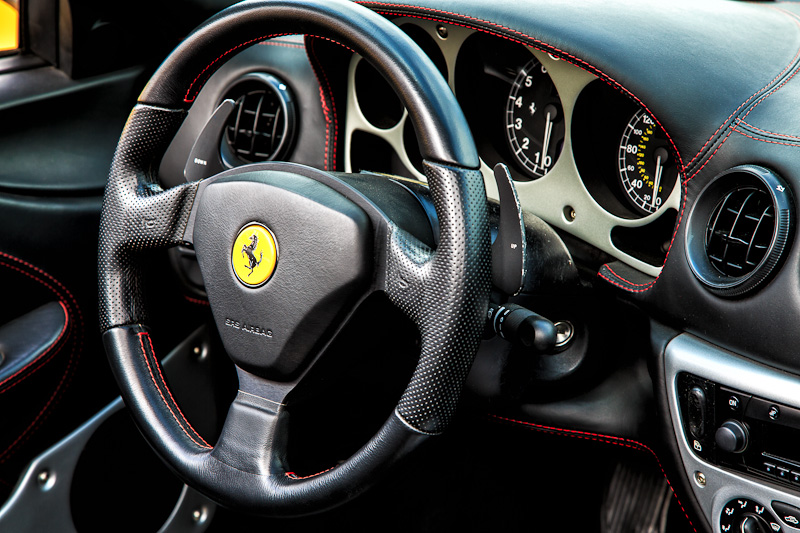
Interiors can work, too. The light has to enter windows (unless the car is topless!), bounce around inside, and gives us something more to work with. It’s a type of shot that’s becoming popular for HDR – high dynamic range. You shoot several similar images changing the exposure then combine them using special software. I’ve written about that process here before, but I never found a shot I really wanted to use that technique myself this time. Notice that it helps to avoid including the outside of the car with the interior shot. HDR would allow that, but without using that technique, the exposure differences would be troublesome. Even the top of the dashboard can stretch the exposure range needed.

Another big issue is people milling about. They don’t really add to a photo of a car, unless your objective is to document the car show as such. That’s okay, but not what I was after. Keeping the image tighter like the shot below can help – there’s just fewer places for the people to be, unless they walk between you and the car. Or you can try to capture the image you want and use the power of Photoshop to save the day.

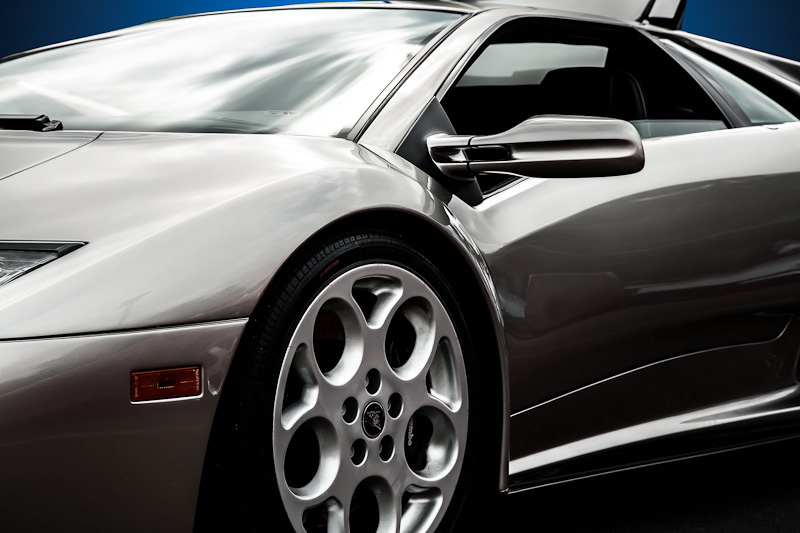
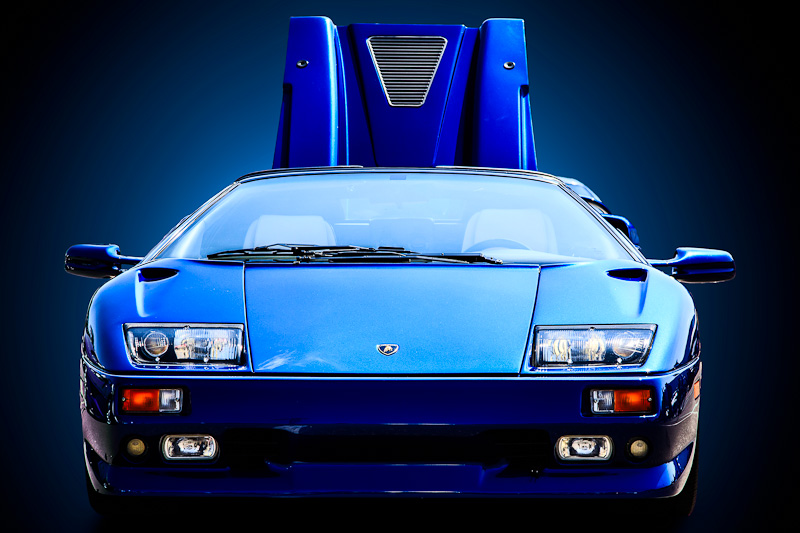
You can use both techniques and have less work to do as I did in this shot of the silver Lamborghini, with only the small corners needing to be managed. But there remains some reflection problems. The cars are parked among others. There may be people visible in the reflections. Colors you don’t want.

The Lamborghinis have the advantage that many of their panels aim up at the sky, limiting the problem. You’ll never get a perfect car photo at a show – without a ton of work (which makes it less than a perfect photo in my thinking). But you can still make them presentable. I used HSL (hue, saturation, luminosity) layers to alter some colors or tone them down. On the silver car, I also used a bit of content-aware fill to make an adjacent car less prominent, disguising it somewhat. It tended to over smooth large areas making them very noticeable, so I did this carefully and slowly.

The silver car shot is my favorite from the day. What can I say, I love the lines and design of these cars to begin with. After getting it closer to what I wanted, I used Nik’s Color Efex Pro 4 to boost the contrast. CEP4 has several contrast-related filters – at least 4. They do wonders for a shot like this. Frankly, when I pushed up clarity in Lightroom, the change was amazing and made me suddenly realize I had a shot I could work with.

Hope you find a few hints in here for the next time you’re at a car show. I did notice lots of other photographers also getting low, shooting tight. Probably many good images were produced that day. Sadly, I didn’t realize until I was home that I never shot Lance’s Ferrari! What was I thinking?

August 11, 2012

Cash on Delivery at Summerset

Filed under: General photography — Tony Drumm @ 11:29 am

A couple weeks ago, I shot the final production of their summer season at Summerset Theatre, Cash on Delivery. It’s a zany British farce, so you know it starts off in high gear and accelerates from there! The general premise is a fellow who has lost his job but found he could collect benefits from the government for made up tenants. Impersonations, crazy stories, it just goes on and on. I managed to keep up with it pretty well, even while photographing it. And that’s saying something!

The show is all in a box set of the living room with the players scrambling in and out various doors. The very bright pastel and white backgrounds, all well lit, are a bit of a challenge for making really good photos. The wife entering in her bright yellow coat and the green door in the shot above work well, though. It’s one of my favorite shots from the night.

There’s lots of activity, people all over the set. I look for ways to prune down the subjects to a smaller group that still evoke some of the action and craziness.

There were opportunities to catch two people interacting. I was happy for the bright, and large, pink bra as it pops form the photos and was a primary subject in two or three.

There are a few tender moments in the show, perhaps to give the audience some time to recover for the next bit of insanity.

And there’s the requisite dead body scenes – and, of course, the body isn’t actually dead.

I found some moments to shoot a few of my favorite type of shots with the foreground subject interacting with someone in the background. I tend to seek these shots out.

Cast and Crew

Summerset did a fine job with the show, and it’s great to have some theatre choices during the summer. We had just returned from vacation in Door County, Wisconsin a couple days before this shoot. While there, we attended two shows by the Peninsula Players, a long-running professional summer stock theatre. It was a nice addition to the vacation and one I’d recommend.

Lindsey told me the show they’re hoping to produce as the musical next summer for Summerset, and it’s awesome. It sounded like things weren’t all ironed out yet, but if it happens, it should be terrific. Meanwhile, Riverland will be starting classes soon and their new theatre season. And RCT is in rehearsals for The Marvelous Wonderettes. A new theatre season will be here before we know it. And that’s a very good thing!

July 31, 2012

Tutorial Tuesday – Composition 101

Filed under: Tutorials — Tony Drumm @ 6:04 pm

It’s time for another episode of Tutorial Tuesday! This time, I’m aiming my comments mostly toward the casual photographers, those who take lots of snapshots but would like to make those pictures just a bit nicer. There are a some basics to composition that are pretty important, and I could spend a post or two on some of them.

But I want to go right to the beginning, to a couple of hints that will make your shots look more planned, more thoughtful, and easier to view. If you consider yourself a pretty good photographer and – more importantly – if other people do, then you might want to skip the rest of this post (and, maybe, go out and take some photos!).

Okay – so what are these basics? Well, first of all, we need to understand what we’re trying to do. We’re trying to capture the view our eyes see and plop it onto a two-dimensional medium. And we’d like the viewer to see at least a little bit of the view we had. Fundamentally, that’s sort of hard to do. So, number 1 is: Recognize our vision is only a little bit our eyes and tons of our brains.

What’s that supposed to mean? It means when we look, we see exactly what we want to see. Our brains filter out all the junk. We put our subjects in the middle of our view – where our eyes are strongest. We focus on our subjects. We ignore other stuff unless our brains decide it’s important – like that bowling ball hurling toward your face!

But plunk that 3D view down on a screen or a piece of paper, and it all changes.

The first, most important step that will help you take better pictures is to look through your viewfinder (or at your view screen) with this awareness in mind. Look at your subject, but look around the rest of the frame. Is the subject where you want? Is there lots of dead space – we don’t need that (unless it’s a plan). Is there junk like a tree growing out of your child’s head? Is your family a tiny speck within the frame?

It takes just a second or two, but it takes practice. We often just rush, seeing only what we want to see and not what’s really there, or what else is there. Next time, just before you press the shutter, look around the frame.

Number 2 is: placement of the subject. We look right in the middle of our field of view, we focus there. But that’s the worst place for your subject in a photo. When I hand someone a camera to take a picture – say a group shot where I’m in the group – I nearly always know how the group will be composed. All the faces will form a line dead-center across the photo.

For some reason, young children often don’t have this problem, and it seems to be less prevalent among the young who’ve grown up with a camera/phone. But it’s still a common problem. Think of it this way. All the space above the heads is  wasted. Instead of filling the frame with the subjects, we have them resigned to the lower half of the photo.

It’s easy to fix and it relies on the same technique as above. Stop, look, think about the image you’re making before pressing the shutter. Don’t be afraid to reframe the shot, aim the camera below the faces and take a better picture. The beauty of digital is, even if you forget, you can think about it after the shot when you review the image on your LCD. Oh! I need to recompose! Let’s do that shot again!

As I said, these are a couple very basic hints. We can go into the rule-of-thirds and other aspects of composition later. But if you just stop, look, think, and recompose, you’ll be a huge step ahead, and your pictures will look so much better!

July 14, 2012

Summerset’s Picasso at the Lapin Agile

Filed under: General photography — Tony Drumm @ 5:10 pm

This week, Summerset Theatre in Austin presented Steve Martin’s Picasso at the Lapin Agile. It’s a rather esoteric show about a meeting of Picasso and Einstein in a French bistro before either became truly famous. What is genius and can we compare art and science?

I didn’t know the show, so I did a little research first. I like to have some idea what’s coming when I start to shoot. I feel some preparation goes a long way toward producing good photos. Still, I expected a box set with the cafe but didn’t know a lot about the characters and their interactions. There was a lot of movement, a lot of interesting characters, and it made the shoot fun.

The waitress and bar tender are sort of constants. Looking through my photos, I have many with them in the background, watching or working, or working and watching.

Einstein and Picasso

 Between the questions it poses, there’s plenty of humor, and I could hear Steve Martin’s voice throughout the show. I remember some of his first acts on TV years ago. He was incredibly funny, but I had no idea of the intelligence and skills he really possessed back then. It became pretty clear over the years, though.

Elvis stops by from the future

Topping things off, Elvis shows up from the future, and we now have the three important characters to shape the 20th century. I get pretty wrapped up in the photography, so I can’t quite devote enough brain cells to the actual show. I’d like to see it again and take in the dialog more completely.

Say “cheese!”

While the lighting was mostly pretty even through the show, there were a few exceptions, and it’s always fun to see what I can do with the interesting lighting I’m given. I wasn’t sure how much moving around the stage I’d do for this show, but I did plenty. And I took plenty of photos, probably more than I expected. But that’s okay! With a show like this, expressions and gestures can make each shot, even taken in a sequence, different. And it’s good to have choices.

Cast and Crew

 Everyone did a great job. Musicals are always a big draw for audiences, but there’s much more to theatre than that. We’re so fortunate to have so many options here in southeast Minnesota. Remember those big-budget movies will look and sound great on your home flat screen, but live theatre is there only for an instant. Every performance is different. If you haven’t been to our local live theatres, you are missing a great experience. Summerset’s next show, Cash on Delivery, runs at the end of the month.

Tonight, we’re attending the ten-minute plays at The Rep. And Mantorville runs their fun melodramas in the summer. There are plenty of opportunities – hope you have a chance to see some yourself! (And those of you not here in SE Minnesota, check out your own local options!)

July 7, 2012

A New Personal Project

Filed under: General photography — Tony Drumm @ 8:58 am

For me, a personal photography project means stepping out of my normal “routine” and finding something different to shoot and something different to do in post. Last year, I shot my interpretation of the four classic elements, Fire, Water, Air, and Earth. I’m constantly looking for inspiration and other ideas that will stretch my abilities, stretch my vision.

I’ve begun working on my new project entitled I Dance… The concept is a detailed focus on dance and dancers along with a very stylized presentation. It’s fun, in part, because it’s so broad. I expect to be working on it for some time, and I envision creating a series of many images. Well, that’s what I’m thinking now!

I’ve shot a couple sessions so far. I had Chris and Jesse model a few ballroom styles for me. They turned out great providing plenty of raw material. I’ve posted a couple of the resulting images. I asked Morgan to provide some hip-hop moves for me. While I have some ideas going into the shoot, I rely a lot on my dancer subjects to provide ideas. I then shoot some close-ups, trying to show features we don’t normally see as spectators, and some silhouettes.

I’m pleased so far with the results, although I’m not sure how many I’d consider finished, even including those I’m showing here. I sometimes need to spend some time with the images, get to know them, and ask them where they’d like to go. Wherever that is, it’s a fun ride. And I can’t think of a better reason to do a personal project!

July 1, 2012

Four Plays for Coarse Actors

Filed under: Rochester Civic Theatre — Tony Drumm @ 5:07 pm

Rochester Civic Theatre just completed their 60th season with a production of Four Plays for Coarse Actors. Over the course of the show, the actors put on four different plays – two per act – ostensibly as a church fundraising activity. A wide range of problems ensue, including less than remarkable acting or singing, prop problems, set piece problems, and on and on.

The director, Greg, likes to point out how he has witnessed nearly every problem they encounter – for real. I know he has some remarkable stories. Lynne has a few of her own (that Italian play). And I’ve witnessed some myself. Anyway, it was a hoot.

I had quite a range of sets, lighting, and costumes to shoot, pretty much covering the gamut I usually see.

Lots of full stage activity, but I was able to zoom in from time to time for a good close shot.

We had moving, sometimes sparse set pieces as well as box sets. That was handled rather cleverly. Box sets are usually unmoving, there for the duration of the show. But, obviously walls and such had to go away for some of the “plays.”

There were some good compositions that work pretty well in photos.

One of the funnier characters was this table which began losing legs forcing the actors to replace them. This leads to lots of (scripted!) improvisation as the players search for a way out of the scene while dealing with holding up the table. Real problems like this are often the topics for conversation when theatre people get together.

The final play is a Shakespearean knock off, sort of like Midsummer Nights Dream, but not. It had cool lighting, lots of colorful costumes, and a flying actor.

That made for some fun photos including this one from near the end of the show.

Greg had another little idea which I learned on the day of the shoot. He wanted to do the cast and crew photo as a composite containing the “casts” of each of the four shows. Okay…

All the cast for all four plays along with the crew!

I was able to do three of the four pretty easily. It was that danged fourth one with the crew that took a bit more thinking. But I think I managed to pull it off pretty well. I guess I kinda like a Photoshop challenge now and then!

« Newer PostsOlder Posts »

Powered by WordPress

Verified by ExactMetrics